


You feel bad windows in Nampa before you fully see them.
In January, it's the chair near the living room window that nobody wants to sit in because the glass throws cold into the room. In July, it's the west-facing side of the house that heats up long before dinner, even with the blinds closed. Add a little road noise, a little condensation, a little brittle caulk, and what looked like a minor annoyance starts acting like a whole-house comfort problem.
That's why window replacement in Nampa, Idaho usually isn't about looks alone. It's about fixing weak points in the part of the house you use every day, especially in a climate that swings from hot summer sun to cold winter mornings. The right move might be a quick seal-up for now. It might be a full replacement. The trick is knowing the difference before you spend money.
Table of Contents
- Is It Time for New Windows in Your Nampa Home
- Pinpointing the Problem with Simple DIY Window Tests
- Evaluating Your Options Quick Fixes vs Full Replacement
- How to Budget for Your Nampa Window Replacement
- What to Expect from a Professional Window Installation
- Achieve Year-Round Comfort with Modern Window Technology
Is It Time for New Windows in Your Nampa Home
A lot of homeowners wait too long because the problem builds slowly. One winter, you notice a draft near the bottom sash. The next summer, one room gets hotter than the rest of the house. Then you start turning the thermostat up and down to chase comfort that never really settles in.
Older windows often fail in ways that don't look dramatic from the curb. The frame may still look decent. The lock may still work. But the house tells the truth. You hear more outside noise than you used to. The glass feels cold on winter mornings. Interior trim shows light staining or the caulk line starts cracking and shrinking back.
What local demand says about the problem
If you're shopping for window replacement in Nampa, Idaho, you're not looking at some unusual project category. It's a normal, active part of home improvement in the Treasure Valley. Public-facing service area and project information shows activity in 83651, 83686, and 83687, with a completed project in Nampa 83687 listed as recently as 4/26/2026 at $9,035 on this Nampa service area project page.
That matters for a simple reason. A mature local market usually means homeowners are dealing with the same set of issues over and over: drafts, worn seals, aging glass, sun exposure, moisture concerns, and the decision between patching and replacing.
Practical rule: If the room feels uncomfortable when you're near the window, don't judge the window by appearance alone. Comfort failures usually show up before total visual failure.
Signs that push a house from repair into replacement territory
Some homes need a tune-up. Others are telling you the window system itself is spent.
Watch for these patterns:
- Recurring drafts: You caulked once, maybe twice, and the same spots keep leaking air.
- Condensation between panes: That usually points to a failed insulated glass seal, not just indoor humidity.
- Sticky or warped operation: If a sash drags, won't lock cleanly, or twists when you use it, the frame may no longer be holding shape well.
- Uneven room comfort: One room stays colder in winter or hotter in summer even after HVAC balancing.
- Water concerns: Staining, soft trim, or signs of past leakage call for more than cosmetic work.
In Nampa, those symptoms matter because the weather tests windows in both directions. A weak unit doesn't just underperform during one season. It tends to punish you all year.
Pinpointing the Problem with Simple DIY Window Tests
Before you call for estimates, do a basic diagnosis. You don't need expensive tools to tell whether a window has an air leak, a seal problem, or a frame issue. You just need a quiet evening, a little patience, and a close look at how the unit behaves.
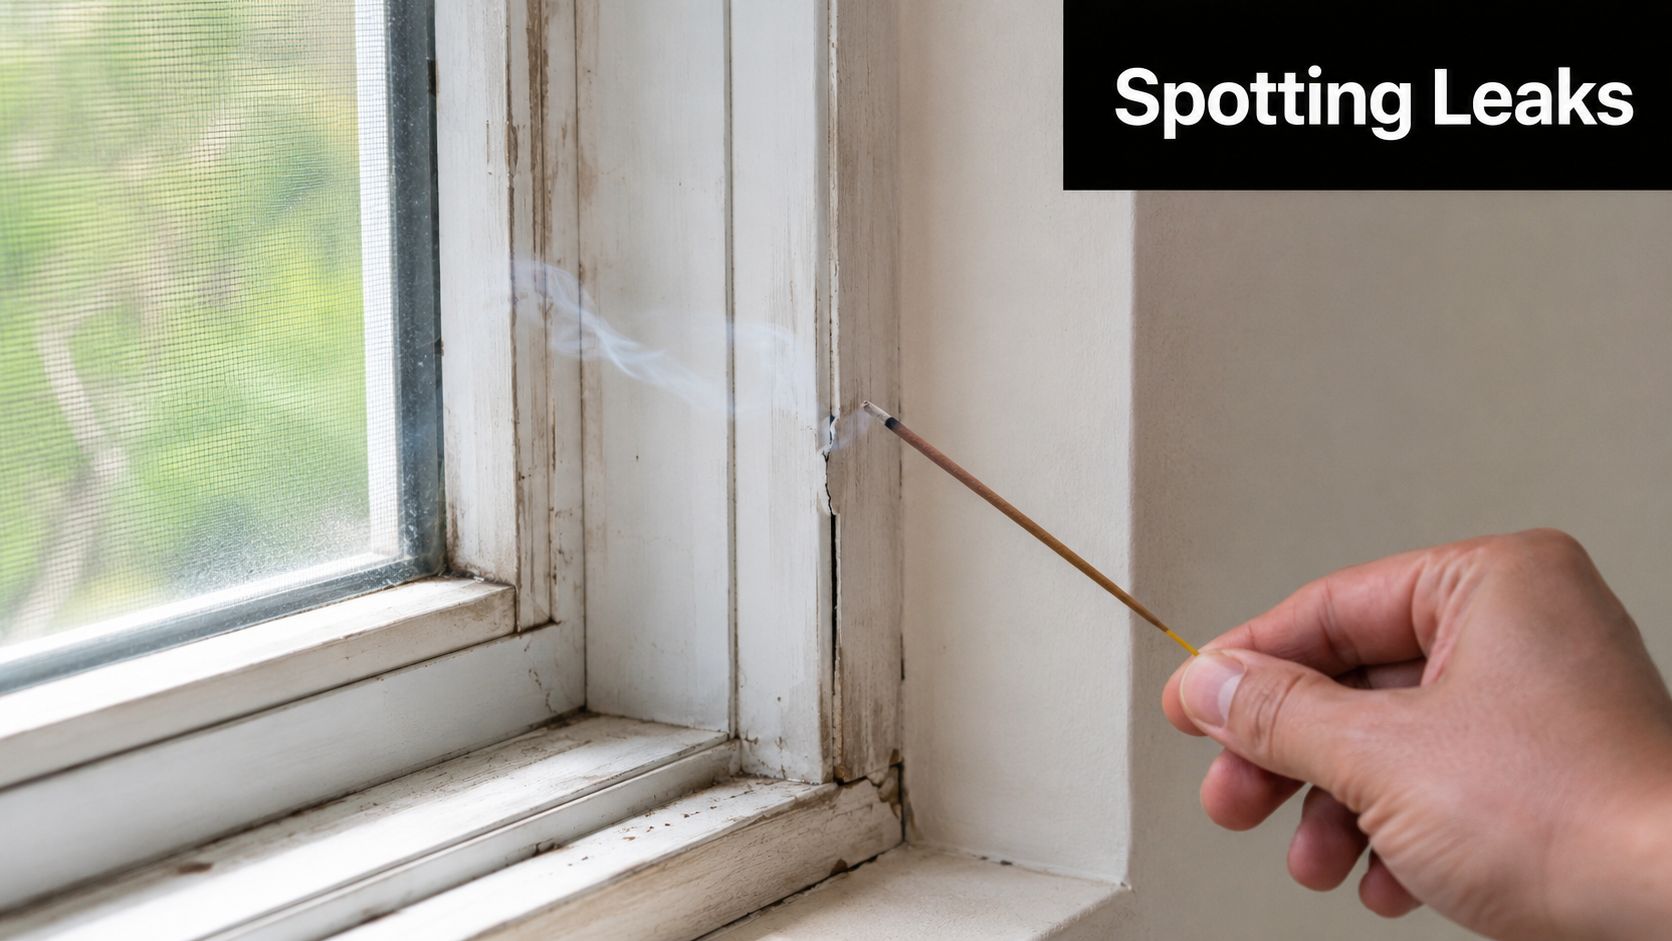
Try the smoke test first
Use an incense stick or another small source of visible smoke. On a breezy day or when your heating or cooling system is running, move the smoke slowly around the sash edges, lock area, stool, and trim line.
Here's what you're watching for:
- Straight upward smoke: Air is relatively calm at that spot.
- Smoke pulling sideways or fluttering hard: You likely have infiltration at that joint.
- Movement at the meeting rail or lower corners: Those are common failure points on aging windows.
Do this from the inside first. If you can safely access the outside, compare what happens around exterior trim and casing. If the smoke shifts at several points on the same window, that usually means more than a missed caulk joint.
Use a flashlight at night
This one is simple and useful. Have one person stand outside with a flashlight after dark while another stays inside. Shine light around the perimeter and across suspect joints.
If you see light coming through where it shouldn't, you've found a gap. That gap may be in weatherstripping, trim, or an area where the frame and opening were never sealed well in the first place.
Small leaks become big comfort problems when they show up on multiple windows in the same exposure.
Look for visual clues in daylight
A lot of homeowners focus on the glass and miss the frame. The frame, sealants, and trim usually tell you more.
Check for:
- Brittle, cracked, or missing caulk
- Paint lines that split open at joints
- Soft or darkened wood near the sill
- Condensation trapped between panes
- Gaskets or weatherstripping that look flattened or torn
- Sashes that don't sit square in the opening
What each result usually means
Not every failed test means you need a full new window. Some findings point to a targeted fix, and some point to a larger problem.
| Test result | Likely issue | What it usually suggests |
|---|---|---|
| Smoke moves at trim edge only | Local air leak | Re-caulking or sealing may help |
| Smoke moves at sash and lock rail | Worn weatherstripping or frame wear | Repair may be temporary |
| Light visible through perimeter gaps | Installation or trim gap | Needs closer inspection |
| Fog or condensation between panes | Failed insulated glass seal | Glass unit or full replacement |
| Window sticks, racks, or won't lock | Frame or sash distortion | Replacement becomes more likely |
Don't ignore moisture signs
Air leakage gets attention because you can feel it. Moisture is often the more expensive problem. If you see staining, softness, or mildew around a window, treat that as a warning that water management may be failing somewhere in the assembly.
That's when a simple patch can hide a deeper issue. A window can look “mostly fine” and still be letting air and moisture work into the opening over time.
Evaluating Your Options Quick Fixes vs Full Replacement
Once you know what's happening, the next question is whether to patch, retrofit, or replace. Homeowners usually get into trouble when they compare options by upfront price alone. The better way is to ask what problem each option solves, and how long it's likely to solve it.
The biggest dividing line is this: sealing helps with air leakage, but it doesn't change the performance of an old window assembly. The DOE point highlighted on this Nampa window services page is useful here. Air sealing helps, but full replacement addresses the entire thermal envelope of the window assembly, which matters in older Idaho homes when the original unit itself is inefficient.
When a quick fix makes sense
Sometimes the smart move is the cheap move, at least for now. If the frame is sound, the sash operates well, and the issue is limited to minor leakage around trim or worn weatherstripping, a short-term repair can buy you time.
Good short-term candidates include:
- Fresh exterior caulk: Best when old sealant has cracked or pulled away cleanly.
- Weatherstripping replacement: Useful on operable windows with otherwise solid frames.
- Interior insulation film: A seasonal bandage for obvious drafts when you need relief tonight.
- Lock and hardware adjustment: Helpful if the sash isn't closing tightly because of alignment, not rot or distortion.
These fixes can improve comfort. They usually won't turn an aging unit into a high-performing one.
Where retrofit fits, and where it doesn't
An insert or retrofit replacement keeps part of the existing frame in place and fits a new unit inside it. This can work well when the original frame is stable, dry, square, and worth preserving.
It's not the right answer when the opening has hidden damage, water issues, frame movement, or poor original installation details. In those cases, retrofit can preserve the very problems you want gone.
If you're comparing frame materials and replacement approaches, it helps to review practical options like vinyl replacement windows for Idaho homes, especially when maintenance and thermal performance matter as much as appearance.
Window solution comparison
| Solution | Typical Cost | Longevity | Effectiveness |
|---|---|---|---|
| DIY sealing and weatherstripping | Lower upfront cost | Short-term to moderate | Good for isolated leaks |
| Retrofit or insert replacement | Mid-range investment | Moderate to long-term | Good when existing frame is truly sound |
| Full replacement | Highest upfront investment | Long-term | Best for whole-assembly problems |
If the glass is old, the sash is worn, and the frame leaks in multiple places, repeated repairs usually become a payment plan for eventual replacement.
A practical decision filter
Use this simple test before you spend money:
- If the problem is at the edge, sealing may help.
- If the problem is in the unit itself, patching rarely changes much.
- If there's moisture or distortion, stop thinking cosmetic and start thinking structural.
- If comfort is the actual complaint, judge the solution by year-round performance, not by whether it looks cleaner after installation.
That last point matters in Nampa. Summer sun and winter cold expose weak glass packages fast. If the home still feels uncomfortable after minor repairs, the old assembly is often the limiting factor.
How to Budget for Your Nampa Window Replacement
Budgeting gets easier once you stop treating all windows like the same project. A basic swap in a standard opening is one thing. A home with larger units, better glass packages, or performance-focused upgrades is another.
For Nampa specifically, homeowner-facing replacement pricing is commonly tracked at about $270 per window on average, with a broader range of $180 to $410 per window, while energy-efficient installations average about $400 per window according to this Nampa window pricing guide. That gives you a local baseline, not a guaranteed bid.

The same pricing reference also gives a useful planning example. A 10-window project at the lower local average could land near $2,700, while the same scope using the energy-efficient average could approach $4,000 before premium upgrades. That's why window replacement in Nampa, Idaho should be budgeted as a capital home project, not a weekend repair.
What moves the price up or down
The final number changes when the project moves away from a straightforward replacement.
The biggest cost drivers are usually:
- Window size: Larger glass units need more material and more careful handling.
- Frame material: Some materials cost more upfront but may offer better longevity or lower maintenance.
- Glass package: Higher-performance options add cost, especially when you step up for better thermal control.
- Labor complexity: Hard-to-access openings, trim work, or problem openings can change the installation effort.
Where homeowners misread the budget
The common mistake is comparing a low-spec quote to a higher-performance quote as if they're the same product. They often aren't. One may fill the hole. The other may be built to handle Idaho's temperature swings with less draft, less interior glass chill, and better control of solar heat.
That doesn't mean every house needs the highest-spec package available. It does mean the cheapest window often looks cheapest after the first hard season.
Budget reality: The right question isn't “What's the cheapest window?” It's “What level of performance solves the problem I'm actually paying to fix?”
A practical way to plan the spend
Break the decision into three layers:
- Must-have items: Windows that no longer operate safely, leak, or show clear seal failure.
- Comfort upgrades: Rooms with harsh afternoon heat, cold seating areas, or noise concerns.
- Long-range improvements: Matching the rest of the house after the worst windows are handled first.
That approach keeps the project from feeling all-or-nothing. Some homeowners replace in phases. Others do the whole envelope at once to avoid mixing performance levels across the home.
If you're comparing estimates, ask each installer to separate product choice from installation scope. A clean budget should tell you whether the added cost comes from better glass, better frame construction, or more involved site work.
What to Expect from a Professional Window Installation
The product matters. The installation decides whether that product performs the way it should.
A technically sound replacement starts before anyone removes a sash. The benchmark is a full-site assessment that checks energy loss, moisture risk, ventilation, and code concerns before the new unit is selected. The Portland Clean Energy Fund guidance also stresses safety and durability first, then ventilation, moisture control, air sealing, and thermal comfort, along with climate-appropriate ENERGY STAR-rated windows and lead-safe assumptions for pre-1978 homes on this window replacement workflow document.
What a proper process looks like
A good crew doesn't rush to “pop in” a replacement unit. They follow a sequence that protects the opening and the home.
A typical professional flow includes:
Assessment and measurement
The installer checks the opening, operation, surrounding condition, and any code issues such as egress or safety glass requirements.Careful removal
Interior stops, sashes, and parting strips are removed without tearing up adjacent finishes more than necessary.Opening prep
The rough opening gets cleaned, checked, and made ready for a full seal.Sealing and placement
The new unit is installed per manufacturer instructions with weather-appropriate sealants.Exterior and interior finishing
Exterior stops are sealed, trim is reset or finished, and operation is checked before cleanup.
What separates a real replacement from a cosmetic swap
The most common failure points are not glamorous. They're the boring details installers skip when they move too fast.
Watch for these quality markers:
- Moisture management is addressed: Water has to shed away from the assembly, not get trapped behind trim.
- The frame-to-wall interface is sealed well: Under-sealing this area is a major reason “new” windows still feel drafty.
- Sealants match the job: The wrong product can fail early or perform poorly with adjacent materials.
- The opening is clean before installation: Dirt, old debris, and leftover materials interfere with proper sealing.
One local option homeowners consider for Treasure Valley installation support is a local window company serving the Treasure Valley. The useful thing to compare across any provider is not sales language. It's whether the crew's process covers assessment, opening prep, sealing, code details, and cleanup in a clear order.
New windows don't fix an old opening by magic. The crew has to correct what's wrong around the window, not just replace what's inside it.
Questions worth asking before installation day
Ask direct questions. Good installers won't dance around them.
- How do you prep and seal the opening?
- What do you do if you find moisture damage or out-of-square conditions?
- Are exterior stops and sealants part of the scope?
- How do you handle egress and safety glass requirements when needed?
- What gets cleaned up and hauled away at the end?
The answers tell you a lot. If the explanation sounds vague, the workmanship often will too.
Achieve Year-Round Comfort with Modern Window Technology
You notice this first on a January morning or a hot August afternoon. The thermostat says the house is fine, but the chair by the window feels cold in winter and overheated in summer. In Nampa, that usually points to glass performance, not just the frame.
Idaho's climate puts windows to work year-round. We get strong summer sun, dry heat, cold snaps, and long stretches where interior comfort depends on how well the glass slows heat movement. That is why Low-E coatings and gas fills are not fancy add-ons in this market. They are often the difference between a room that looks good and a room you want to sit in.

What these upgrades change in daily use
Homeowners hear the terms all the time. What matters is how they perform in a Nampa house.
Low-E coatings reduce heat transfer through the glass. In practice, they help cut summer sun gain and reduce that cold-glass sensation in winter.
Gas fills such as argon improve the insulating value inside the glass unit compared with standard air-filled glass.
Triple-pane glass adds another insulating space. That can improve comfort near the window, reduce outside noise, and help steady indoor temperatures during Idaho's temperature swings.
The biggest mistake I see is treating every room the same. A small shaded window on the north side does not need the same glass package as a large west-facing living room window that takes direct afternoon sun.
Where a stronger glass package pays off
A higher-performance package makes sense when the problem is ongoing and tied to the exposure of the room, not just the age of the window.
- West- and south-facing rooms overheat in summer
- Seating areas near windows feel cold in winter
- You have recurring interior condensation
- Street or neighborhood noise carries into the room
- You plan to stay in the home long enough to feel the comfort difference every season
For homeowners comparing colder-weather options, this guide on triple-pane windows for Idaho winters gives a useful look at where the added cost makes sense.
A premium glass package costs more up front. In Idaho, it often pays you back in comfort every day the weather turns against the house.
Why this matters for long-term value
The cheapest proposal often covers basic replacement. That does not always solve the complaint. If the goal is to reduce drafts, limit solar heat gain, cut condensation, and make the room feel more stable, the glass package deserves as much attention as the window style.
That is the long-term value in modern window technology for Nampa homes. In a place with hot summers and cold winters, better-performing glass is not a luxury line item. It is a practical investment in how the house works.
If you're weighing window replacement in Nampa, Idaho and want a practical opinion on what to repair, upgrade, or fully replace, C & C Windows & Doors offers in-home consultations for Treasure Valley homeowners. A good next step is to measure the existing windows, identify the rooms with the biggest comfort problems, and match the glass package to the way your home handles heat, cold, and noise.