


A Boise morning can feel fine in the hallway and suddenly miserable in the bedroom by the window. The curtain twitches, the glass feels cold, and one corner of the room never quite warms up no matter how long the furnace runs. That's usually not “just winter,” it's a draft path that can often be traced, sealed, or used as the clue for a smarter repair.
Table of Contents
- What That Cold Air Is Telling You
- Finding the Exact Source of Each Draft
- Sealing Gaps with Weatherstripping and Caulk
- Adding Insulation Film and Storm Windows for Extra Protection
- Comparing Costs, Lifespan, and Real Energy Savings
- When It Is Time to Replace Instead of Repair
- Putting It All Together for Your Treasure Valley Home
What That Cold Air Is Telling You
January is where draft hunting gets real in the Treasure Valley. You stand near the bed, see the curtain shift, and feel that thin line of cold air that seems to come from nowhere. In practice, that “nowhere” usually points to one of four places, and each one calls for a different fix.
Start with movement, then confirm the leak
The quickest test is a candle or incense stick held near the window. If the smoke bends or the flame flickers, you've found active air movement, not just a cold surface. That matters because moving air usually means a leak path, while a cold pane by itself can just be poor insulation.
Next, look at the sash and hardware. If the window doesn't close evenly, or the lock doesn't pull the meeting rails tight, the draft is likely coming from the moving parts, not the wall opening. A flashlight check after dark can also reveal daylight at the frame edges, which usually means the air barrier is weak at the perimeter.
Practical rule: if you can feel the chill with your hand, but the sash looks tight, assume the leak is at the trim or frame-to-wall joint until proven otherwise.

A hand-feel pass closes the loop. Run your palm slowly around the interior trim, the bottom of the sash, and the corners where casing meets drywall. If the cold is strongest at the trim edge, the leak is likely at the frame-to-wall seam. If it's strongest where the sash moves, you're dealing with a sash seal problem, which is a different repair category entirely.
Finding the Exact Source of Each Draft
A lot of homeowners blame the glass first, but the actual leak is often a little higher, lower, or deeper in the assembly. I've seen a room blamed on “bad windows” when the actual issue was a gap at the top stop molding, and I've seen a curtain blamed when the leak was coming from the sill. The window tells you where to look if you slow down and read the symptoms correctly.
Match the symptom to the location
Drafts that show up at the meeting rail on double-hung windows usually mean the two sashes aren't sealing tightly against each other. Drafts at the top and bottom sash edges often point to worn weatherstripping or weak lock compression. If the air seems to come from the perimeter frame, the problem may be at the frame-to-wall joint, the interior trim gap, or the exterior siding junction.
A sill leak feels different. The air tends to roll in low and cold, and it can make the area under the window feel disproportionately chilly. That's one reason a “feel test” around the trim has to include the bottom edge, not just the obvious side jambs.
The one place you don't seal blindly is the weep hole. Those openings are part of the drainage design, and they need to stay open. If you cover them with caulk or foam, you can trap moisture in the window system and create a bigger problem than the draft you started with.
Some homeowners want to seal every visible opening. That's the wrong instinct around drainage openings, because not every gap is an air leak.
For a broader home performance check before you start sealing, use a structured evaluation like this Boise home energy audit resource. It helps separate true air leakage from the parts of the window that are supposed to move or drain.

Sealing Gaps with Weatherstripping and Caulk
A draft usually points to two different failures, a moving joint that no longer presses tight, or a fixed seam that has opened up around the frame. Weatherstripping belongs on the parts that open and close. Caulk belongs on the stationary gaps where the frame meets the wall, trim, or siding.
Put the right material in the right place
Weatherstripping works best on the inside frame where the sash closes against it. On double-hung windows, that often means the top edge of the upper sash and the bottom edge of the lower sash. On wider windows, two locks placed a few inches from the outer edges can pull the sash in tighter than a single center lock.
Use the thickest profile that still lets the window close fully. If the sash has to fight the seal, the profile is too aggressive. If the strip barely compresses, it will not stop much air. In the field, I get better results when the homeowner tests the closure by hand before running the full length.
For fixed seams, caulk is the cleaner answer. Remove loose, cracked, or dirty old material first, then clean and dry the joint before applying a fresh bead. That prep work matters more than many homeowners expect. Caulk will not bond well over damp dust, peeling edges, or softened residue, and those weak spots become the new leak path.
Keep the window's intended functions intact
A good seal stops unwanted air movement while preserving drainage and sash operation. Keep the weep hole open, and use flexible seals on moving parts instead of rigid filler. If you cover a drainage opening with caulk or foam, moisture can get trapped inside the window system and turn a small draft into a larger repair.
Practical rule: if the joint moves, use weatherstripping. If it does not move, use caulk.
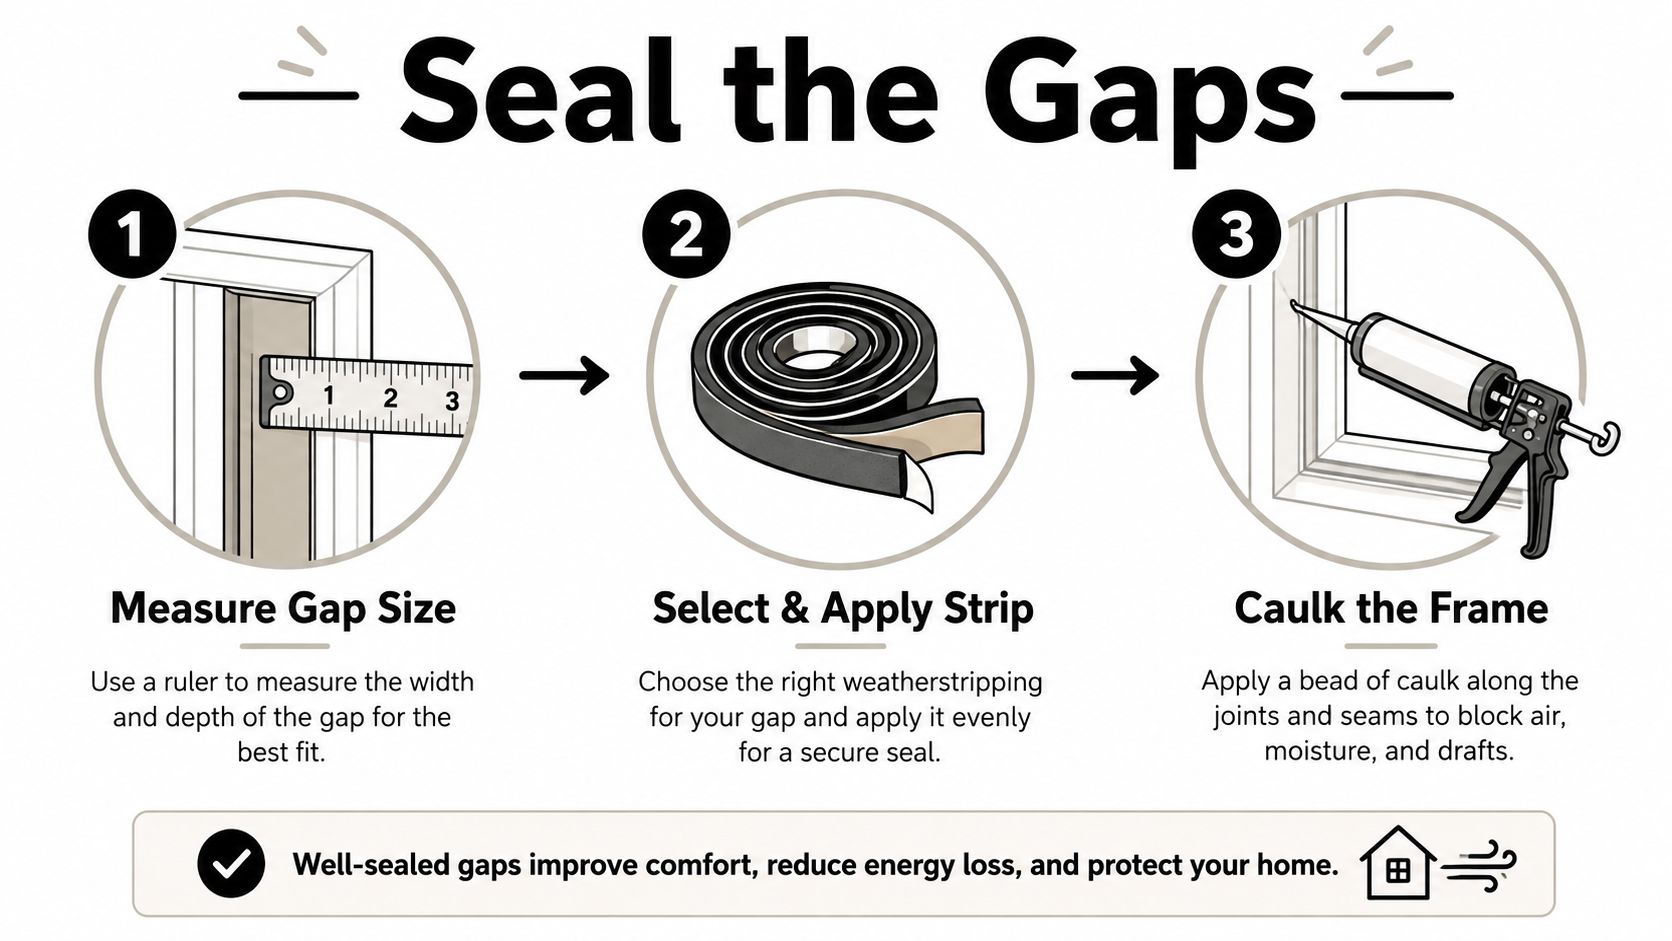
For exterior-exposed seams, choose a sealant made for weather exposure. Interior seams can be finished more cleanly with a paintable interior product. If you want a local crew to handle measurement, sealing, and replacement in one visit, this guide to preparing your Boise home windows for winter is a useful place to start, and the same repair logic still applies whether you do the work yourself or hire it out.
Adding Insulation Film and Storm Windows for Extra Protection
After the frame and sash are sealed, the next layer is usually about slowing heat loss through the glass itself. That's where temporary film and secondary glazing earn their keep. They don't fix a bad seal, but they can make an already-sealed window feel much more comfortable through the rest of winter.
Use film as a seasonal layer, not a substitute
Interior insulation film works best on clean glass. Cut it slightly oversize, apply it to the prepared surface, then smooth from the center outward so bubbles don't get trapped at the edge. If the film is stretched or the surface wasn't cleaned well, the edges can lift and the result looks sloppy fast.
That's why film makes more sense as a seasonal layer than a permanent answer. It's useful when the window is serviceable but still feels cold, especially in rooms you don't want to fully replace yet. Thermal curtains and cellular shades can help too, especially in bedrooms and north-facing rooms, but they work best as an added layer, not as the primary seal.
Know where storm options fit
Exterior storm windows and interior magnetic panels sit one step up from film. They're better choices when you want reuse, a cleaner finish, or a more durable seasonal barrier. They also help when the window itself is sound but the glass surface still feels too cold for comfort.
For planning winter prep around Boise weather swings, this winter window preparation guide is a practical companion to the sealing work above. It keeps the focus on layering protection instead of jumping straight to replacement too early.
The important part is sequence. Film and storm solutions come after the sash and frame leaks are handled. Otherwise, you're just insulating around a still-open draft path.
Comparing Costs, Lifespan, and Real Energy Savings
The right fix depends on where the air is moving. A sash leak, a frame-to-wall gap, and a failed insulated glass unit all waste heat in different ways, and they do not deserve the same spend. In the Treasure Valley, I look at the draft source first, then at drainage and whole-home performance, because a patch that traps water or misses the leak costs more later.
Use the comparison below as a decision tool, not a shopping list.
| Fix | Typical Cost | Lifespan | Best For |
|---|---|---|---|
| DIY weatherstripping | 5 to 15 per window | Seasonal to several years, depending on wear | Sash and perimeter air leaks |
| Rope caulk | Qualitative, low-cost | Temporary | Small gaps and short-term winter sealing |
| Insulating film | 10 to 30 per window Harrington Windows | Seasonal | Cold glass and mild drafts after air sealing |
| Interior storm panels | Qualitative, moderate | Reusable seasonal upgrade | Better glass insulation without replacement |
| Full replacement with double-pane or triple-pane ENERGY STAR 7.0 units | Qualitative, higher upfront cost | Long-term | Persistent drafts, failed seals, warped frames, old single-pane windows |
Keep the energy conversation grounded
Window losses are not a small thing. The U.S. Department of Energy, as quoted by Arax Windows, says heat gain and heat loss through windows account for 25% to 30% of residential heating and cooling energy use in the United States. That is why sealing the obvious leaks first makes sense, and why an aging window can still leave the room uncomfortable even after you do the basic repairs.
Harrington Windows notes that replacing single-glazed windows with double glazing can eliminate drafts entirely and reduce heat loss by up to 50%. That kind of gain matters most when the window assembly itself is tired, not just when the trim needs a fresh bead of sealant. In that case, the key question is whether you are buying another season of patching or a better-performing system that fits the house.
If the leak is a small gap and the frame is still sound, spend like a repair. If the window keeps pulling away from tight sealing after you have already fixed the obvious spots, use this guide on when to replace windows instead of repairing them and look at replacement like a threshold decision, not a guess.
The right fix is the one that stops the actual leak, not the one that looks the biggest on paper.
One more practical rule from the field, do not treat every draft the same. A narrow sash leak can often be handled with weatherstripping, while a cold pane that still sweats, leaks, or feels frigid after air sealing may justify film, storms, or a full swap depending on the age of the unit and how the rest of the home performs.
When It Is Time to Replace Instead of Repair
A draft that keeps coming back after you have already sealed the obvious gaps usually points to a window that has moved past simple repair. At that stage, the frame, sash, or glass unit is part of the problem, and another bead of caulk will only buy a little time. Around Treasure Valley homes, I see this most often on older windows that were patched more than once and still leak when the weather turns cold.
Watch for the signs that point past DIY
Condensation or fogging between panes is one of the clearest signs that the insulated glass seal has failed. Soft, warped, or deteriorating wood frames are another warning, because caulk cannot restore a frame that no longer holds its shape. If daylight shows around a closed sash, or drafts continue after fresh weatherstripping, the assembly is no longer closing the way it should.
Cold interior glass in winter tells you something too. Older units, especially single-pane windows, often feel frigid even when the frame itself looks intact. A replacement built with composite-reinforced sashes, slim narrowline frames, sloped sills, ClimaTech Low-E coatings, and argon gas fills gives the house a steadier seal and better durability than aging units usually provide.
Use the replacement threshold like a business decision
If a large share of the home's windows needs new weatherstripping, or the windows are over 20 years old, whole-home replacement often makes more sense than keeping up with piecemeal repairs. That does not mean every window has to be replaced at once. It does mean the problem has moved from a single leak to a pattern across the house.
Triple-pane upgrades make the most sense on busier Treasure Valley streets, where noise reduction matters along with draft control. For homeowners weighing repair against replacement, this replacement-versus-repair guide gives a practical way to judge the threshold without guessing.
Replacement is the right call when the draft comes from the assembly itself. A simple gap can be sealed in an afternoon, but repeated seal failure, frame movement, or a sash that will not hold a tight closure calls for a better long-term fix.
Putting It All Together for Your Treasure Valley Home
A practical fix starts with the source, not the product. Check for moving air, then sort the leak into one of three buckets, sash, frame, or wall joint. Seal fixed gaps with caulk, use weatherstripping on parts that move, and add film or storm panels only when the glass still feels cold after the obvious air leaks are handled. If the window fogs between panes, the frame has warped, or drafts return after the easy fixes, replacement deserves a closer look.
A good starter checklist looks like this.
- Run the four diagnostics: candle or incense, sash inspection, flashlight check, and hand-feel test.
- Seal frame-to-wall leaks: clean the joint first, then apply caulk where nothing moves.
- Weatherstrip the sash: focus on the inside frame, closure pressure, and the areas where the sash meets.
- Add film for the rest of winter: use it after the seal is already tightened.
- Schedule a consultation if the problem repeats: especially if more than two windows show condensation between panes or rotted frames.
The least expensive fix is the one that matches the actual draft source. In Boise and across the Treasure Valley, that usually means starting with sealing, then deciding whether the window still deserves another season or needs a full upgrade. When the home needs a more permanent answer, American-made, factory-trained installation is the difference between a patch that buys time and a repair that holds up through Idaho weather.
If your windows still feel drafty after the basics are done, C & C Windows & Doors can inspect the seals, frame fit, and replacement options for your Treasure Valley home. Visit C & C Windows & Doors to schedule a free in-home consultation and get a straight answer on whether repair or replacement makes more sense.